Having the right tools and knowledge is essential for DIY and electrical repairs. Splicing an extension cord is a crucial skill every DIY enthusiast and electrician should have in their arsenal. Whether you need to extend the reach of your power source, repair a damaged cord, or customize your cord length, knowing how to splice an extension cord safely can be a valuable skill. This step-by-step guide will take you through the process, highlighting safety precautions and troubleshooting tips for common issues.
Why Splice an Extension Cord?
Before diving into the nitty-gritty of splicing an extension cord, let’s understand why it’s a handy skill. Extension cords are a versatile tool, but sometimes, they just need to be the right length for your needs. Splicing allows you to customize your cord to the required size, reducing clutter and potential tripping hazards in your workspace.
Moreover, if your extension cord has suffered damage – maybe it got nicked by a lawnmower or chewed by a mischievous pet – you don’t have to throw it away. Splicing can save money by giving your damaged cord a second chance at life. It’s eco-friendly, too!
Tools and Materials You’ll Need
Before you start, gather the necessary tools and materials:
Tools:
- Wire cutters/strippers
- Heat shrink tubing
- Soldering iron
- Solder
- Utility knife
- Electrical tape
- Screwdriver
Materials:
- Extension cord with damaged ends (or a longer one to customize)
- Replacement male and female plugs (if necessary)
- Heat-resistant gloves
- Safety goggles
- Fireproof work surface
Step-by-Step Guide on How To Splice an Extension Cord
Now, let’s get our hands dirty – figuratively, of course – and splice that extension cord safely and effectively. Remember, safety comes first!
Step 1: Safety First
Before you start splicing, ensure your safety gear is in place. Put on heat-resistant gloves and safety goggles to protect yourself from potential hazards. You’ll also want to work on a fireproof surface to prevent accidents.
Step 2: Cut the Cord
Using wire cutters, cut the damaged part of the extension cord. Make sure to cut it clean and straight to ensure proper connections. If you’re customizing the length of your cord, cut it to your desired size.
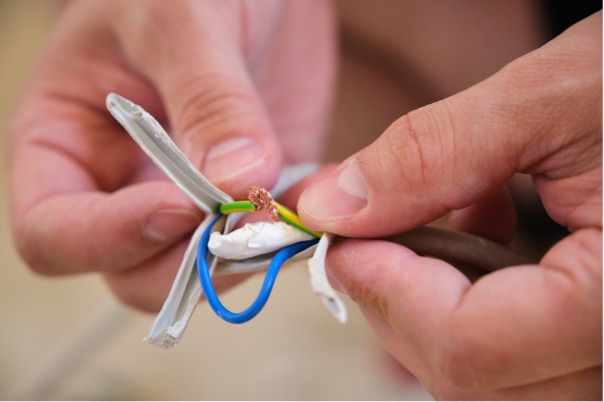
Step 3: Strip the Wires
Using wire strippers, carefully strip about 1 inch of insulation from the ends of the wires. You should expose the copper wire beneath. Keep your extension cord separate and organized if it has more than two wires.
Step 4: Prepping the Replacement Plug
If you’re replacing the plug (male or female), follow the manufacturer’s instructions that came with the replacement plug. Typically, you’ll need to loosen screws to access the connection points.
Step 5: Solder the Wires
Now, it’s time to solder the wires. A soldering iron is used to melt solder, which securely bonds the wires. Ensure the wires are clean, then apply a small amount of solder to the exposed copper. It should flow smoothly over the wires.
Step 6: Heat Shrink Tubing
Slide a heat shrink tubing over each wire connection for added safety and insulation. This will help protect the connection from moisture and physical damage. Gently heat the tubing until it shrinks and forms a snug seal.
Step 7: Electrical Tape
Wrap each connection with electrical tape, providing an extra layer of protection and stability. Make sure there are no exposed wires.
Step 8: Reassemble the Plug
If you removed the plug earlier, reassemble it according to the manufacturer’s instructions. Ensure a snug fit and tighten any screws securely.
Step 9: Test Your Splice
Before using your newly spliced extension cord, test to ensure it works correctly. Plug it in and test the connected appliances or tools. If everything runs smoothly, congratulations – you’ve successfully spliced your extension cord!
Troubleshooting Common Issues When You Splice an Extension Cord
Splicing an extension cord can be straightforward, but sometimes problems arise. Here are some common issues and how to troubleshoot them:
1. No Power:
If you’ve followed the steps and there’s no power to your devices, first, check the connections. Ensure the wires are securely soldered and that there are no exposed wires. If everything looks good, your issue might be with the replacement plug. Double-check that you’ve assembled it correctly.
2. Short Circuit:
If your extension cord is causing a short circuit, it could be due to a loose connection or exposed wires. Inspect the cord for any signs of damage or exposed copper. If you find any, re-solder the connection and reapply heat shrink tubing and electrical tape.
3. Overheating:
An overheating cord can indicate excessive resistance in the connection, potentially due to insufficient soldering or damaged wires. Revisit your soldering job, ensuring it’s solid and secure.
4. Sparks or Burning Smell:
If you notice sparks or a burning smell, unplug the cord immediately. This can be a sign of a dangerous short circuit or faulty soldering. Carefully inspect the cord and make necessary repairs before using it again.
Conclusion
Splicing an extension cord is valuable for DIY enthusiasts and electricians. It allows you to customize cord lengths, repair damaged cords, and reduce waste. However, it’s crucial to follow the process, prioritizing safety throughout. Always use the right safety gear and double-check your connections to avoid electrical hazards.
Remember, practice makes perfect. If you’re new to splicing, start with an old or damaged cord to hone your skills. With time and experience, you’ll become a pro at splicing extension cords, making your DIY projects smoother and more efficient.
So, there you have it – a comprehensive guide on splicing an extension cord safely and effectively. Now it’s time to put your new skills to the test and enjoy the flexibility and cost savings that come with splicing your extension cords.
If you have any questions or want to share your splicing experiences, please leave a comment below. We’re here to help and learn from one another in the vibrant community of DIYers and electricians.
FAQ’s
Q1: Is it safe to splice an extension cord myself?
Answer: Splicing an extension cord can be safe if done correctly and with the right safety precautions. It’s essential to wear safety gear, follow the step-by-step guide, and double-check your connections to prevent electrical hazards.
Q2: Can I splice an extension cord with more than two wires?
Answer: You can splice an extension cord with more than two wires. Keep the wires organized and separated during the splicing process, following the same steps outlined in the guide.
Q3: What should I do if my spliced extension cord isn’t working properly?
Answer: If your spliced extension cord isn’t working, first check the connections to ensure they are secure and that there are no exposed wires. If you’ve ruled out connection issues, consider the replacement plug, as it might be assembled incorrectly.
Q4: Can I splice an outdoor extension cord like an indoor one?
Answer: Splicing is generally the same for indoor and outdoor extension cords. However, for outdoor use, use weatherproof connectors and heat shrink tubing to protect against moisture and environmental factors.
Q5: Is there a limit to how many times I can splice an extension cord?
Answer: While you can splice an extension cord multiple times, limiting the number of splices is best for safety and performance reasons. Excessive splicing can lead to increased resistance and potential overheating. If your cord has been spliced multiple times, consider replacing it entirely for safety.